Updated 17 September 2012
Mike Boesen
On occasions I have been asked to troubleshoot Canon printers that have print heads that are of the type that are used in the i865, Pixma iP4000 and iP4200 (and possibly other Pixma) Canon inkjet printers. Some problems are evidenced by printed pictures that are overcast by a colour such as green or purple and/or by the failure of some colours (including black) to print satisfactorily in the Canon Maintenance application's Nozzle Check. Such problems often arise when the printer has not been used for a long time and the print head for one or more of the colours has clogged up. Clogged print heads are often caused through under-use so that things dry up and block.
Another symptom of clogged heads is a banding effect that is most obvious when "plain paper" is the selected print medium. That can look like this (as a result of a clogged Cyan print head):
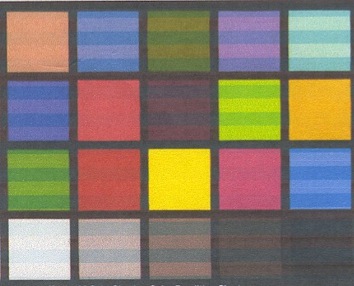
To avoid cloggage I recommend exercising the printer at least every week. At least run the Canon Properties / Maintenance / Nozzle Check function a few times and print a test page that exercises all the colours. The Digital Dog Printer Test File downloadable from a link in this article http://www.normankoren.com/printer_calibration.html is an excellent test page that I use for that purpose.
If the Nozzle Check generates unsatisfactory results try the Canon "Deep Cleaning" maintenance routine. That's accessed through printer Properties / Maintenance / Deep cleaning. Then try the Nozzle check to see what colour or colours are not printing correctly. A number of repeated deep cleans and nozzle checks may indicate that there are problems with a single colour, or multiple colours. That may lead you to replace one or more cartridges to see if the problem was a cartridge rather than clogging in the print head/s. If that fails, read on.
A search on the web shows that a number of methods are advocated for cleaning print heads. This includes, for example use of water, isopropyl alcohol, glycol and windex. Some physical methods advocate use of high pressure water, compressed gas and an an ultrasonic cleaner.
There are views that indicate that the success of particular methods will depend on the following factors:
- state of the print ink - as-new liquid, gummy or dried
- types of colorant: dye or pigment
- if the colorant is pigment, the characteristics of the pigment particles (size, dispersant coating)
- the carrier used for the colorant: this is usually water, but might include co-solvents such as glycol or glycerine
A technique that has worked for me so far with Canon print heads that are not totally dried is to flush out the heads using plain water and some water pressure. I have found this is effective for partially dried (thickened and gummy) dye-based and and pigment-based inks.
However, before trying my method it would be prudent to see if a drop or two of the inks that you use in your cartridges are dispersible in water. If there is any clumping of the ink into particles, then using water as the flushing agent could be counterproductive.
Basic water cleaning method
This is the technique that I use with water for print heads that are not totally dried out:
1. Turn on the power to the printer, open the hatch and when the printer cartridge carriage is centered, remove all the cartridges.
2. Check that there is ink available at the pad at the bottom of each cartridge. Dab the pad with your finger - the ink should form a nice even blob on your finger. If there is no ink, the cartridge should be replaced. Wrap all the cartridges in cling wrap to prevent drying out. The wrapping can be done for the whole bunch of cartridges together
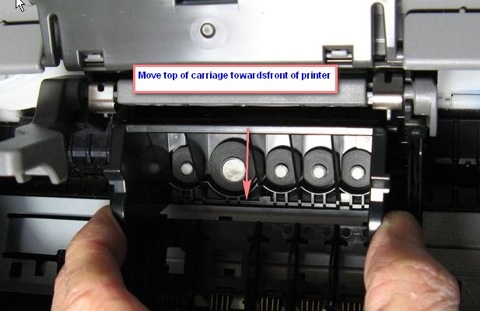
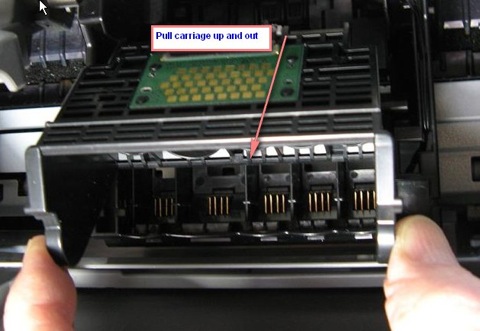
3. Lift up the locking lever. Remove the carriage that the cartridges sit in. The carriage can be tilted forward from the top and lifted out. Then close the locking lever.

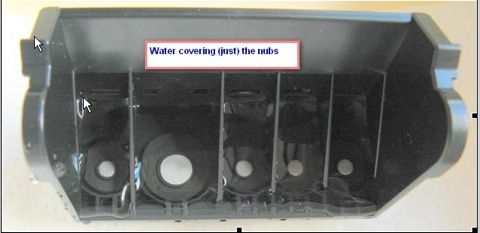
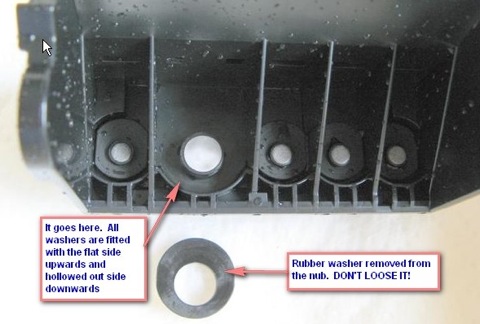
The carriage has nubs on the inside base of the carriage, with an extremely fine stainless mesh on top of each nub and a soft black rubber (or neoprene) washer around each nub.

In the following steps, make sure that you do not loose any of the rubber washers - if any are displaced, replace them. If you loose any, the print carriage will be totally useless.
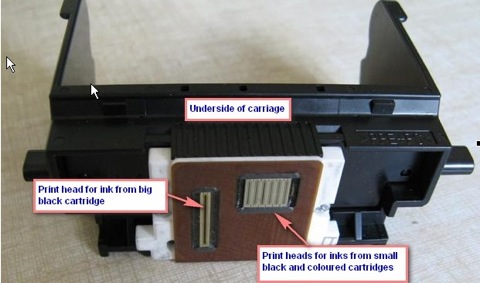
On the underside of the carriage there are the actual print heads: one long (16 mm) thin one is for for ink coming from the big black cartridge. There is also a small square that has individual heads (about 7 mm long) relating to the small black cartridge (1 head), the Cyan cartridge (2 heads), the Magenta cartridge (2 heads) and the Yellow cartridge (1 head).
4. Wipe any accumulated thickened ink off the print heads gently with a wet lint-free cloth. Use running water to assist in this operation is desired.
5. Totally immerse the carriage in water for an hour or so. A totally clean ice cream tub is a good container for this operation.
6. Hold the carriage upright under a fast-running tap so that each of the nubs gets a good flushing with water.
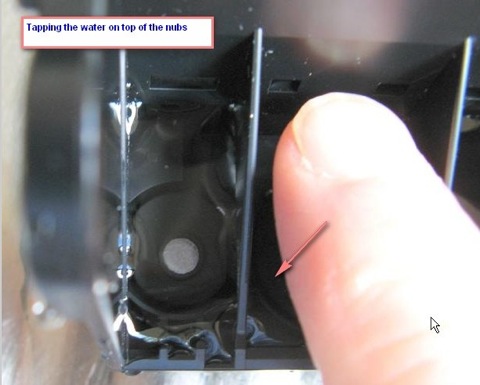
7. With some water covering the filter-covered nub, gently tap the water down with your fingertip onto the top of the nub so as to force water into the orifice. Do that about 20 or so times for each nub. The idea is to encourage the flow of water through the nubs and out the heads.
8. Put about 4 layers of paper towel in the ice cream tub. Fill the base of the carriage with water (it only holds a few mm of water) so that the top surface of each nub is covered with water. Put the carriage on the paper towels. After a few minutes the water will have (hopefully) drained through the nubs and out the bottom through the print heads. Initially this will display itself by ink stains on the paper towel - hopefully you will have lines of stain for each print head. After a few minutes the level of water will (hopefully) have dropped to the level of the top of the nub.
9. Repeat step 8 for 20 or so times or until ink ceases to be shown on the paper towels.
10. Replace the paper towels with dry ones. Empty any water from the carriage. Place the carriage on the towels and leave for a few hours.
11. Shake of any drops of water and wipe the carriage and print heads dry with a lint-free cloth. Make sure that the rubber washers are all in place.
12. Lift up the locking lever. Insert the carriage into the printer. Close the locking lever. Insert the cartridges, making sure that they are locked into place (listen for the click indicating that).
13. Through the Canon Properties / Maintenance application undertake repeated Deep Clean / Nozzle Check operations until you get a satisfactory Nozzle Check printout.
Pressure techniques
Water pressure method
If all that fails, then immerse the head assembly in a tub of water overnight then apply a strong jet of water to the nub that is blocked. That can be achieved using a garden hose with the hoze nozzle set to provide a narrow, strong jet of water. The reason for removing all the washers is that you may accidentally hose off other washers in the process. After drying the carriage, re-insert the rubber washers.
If that fails, you can try applying more pressure (after an overnight soaking in water). There are two ways that I have tried with success to get more pressure - one with a syringe and the other with gas.
Pressure using a syringe
This is fiddly and requires a syringe (buy at a pharmacy - I used a 3 ml size)) and poly tubing (buy from a plumbing supplies shop or hardware shop). The syringe and a short length of tubing looks like this before and after assembly:
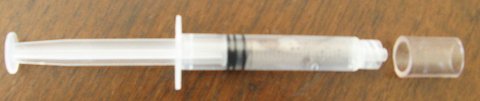
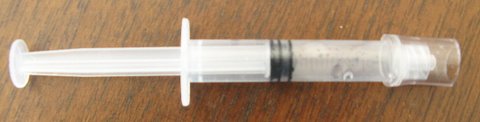
The tubing needs to fit tightly over the end of the syringe. For the syringe that I used, the outside diameter of the end was 10.8 mm, the inside diameter of the tubing was 9.8 mm, and the outside diameter was 11.0 mm
Soak the head assembly overnight in water.
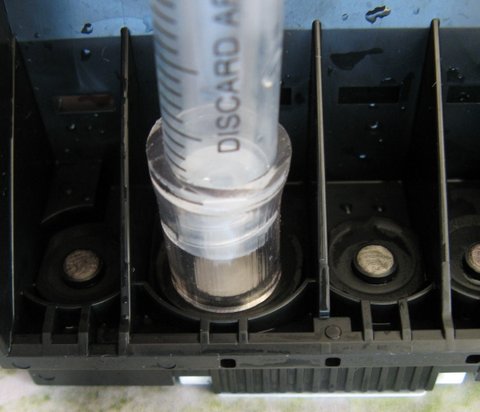
Fill the syringe with water and hold it firmly down over the nub at the base of the inside of the head carriage, so that is being pushed onto the black neoprene washer. Then expel the water in the syringe quickly, attempting to force it through the nub and out through the print head.
Over the large nub:
Over the small nub:
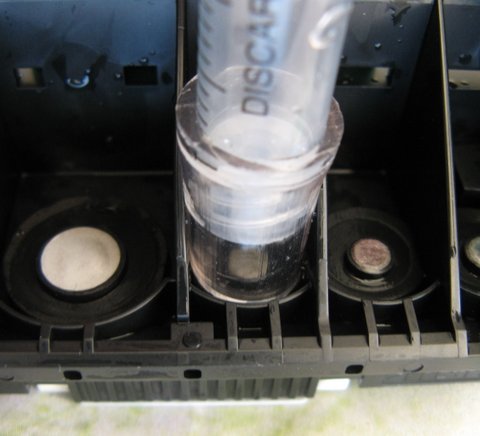
Repeat as many times as you have patience for. If you do this while holding the carriage over a tub of water, with a bit of luck you may see some residue expelled into the water! If the tube is the right size, it will fit just right over each of the nubs.
Applying pressure using gas
A variation on the above method is to get hold of a supply of a non-corrosive gas of some sort or other (e.g. air, nitrogen). Connect a poly tube with dimensions like those above to that source. Immerse the head carriage under water then force the gas+water through each of the nubs.
Dissasembly of the print head
As a last resort you could try disassembly of carriage then cleaning out any goo that might be trapped inside.
Again, soak overnight.
To dissasemble the head, you must be very careful to not stain the electrical connections that are imbedded in the brown ribbon cable. If you break one of the imbedded leads, throw it all in the bin!
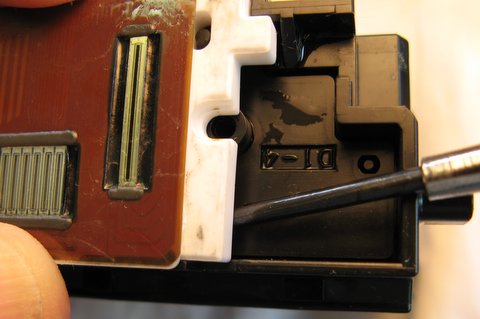
First, note the two screw heads. Undo both using a No. 1 Phillips head (the small sized one - NOT the common No. 2 head).

One screw partially undone:
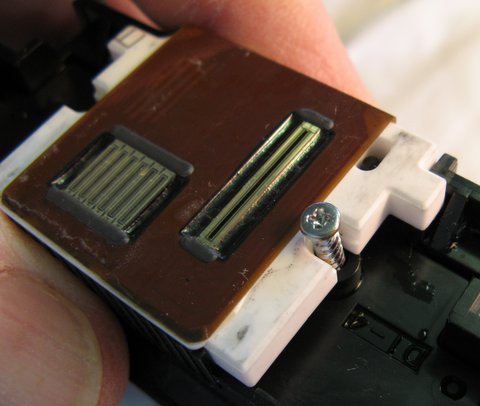
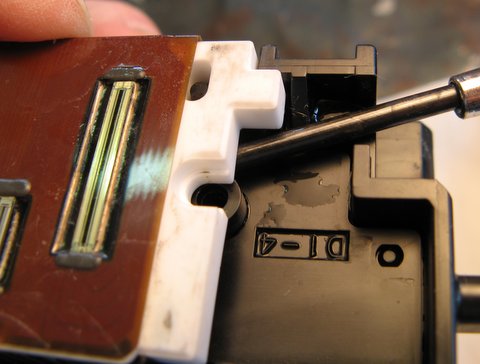
Lever up the white base plate CAREFULLY, initially from the edge that is furthest from the flat conductor cable - that is, at the edge that is closest to the front of the black cradle, as shown at the bottom of this picture. Lever up at both sides of that edge.
Having freed the edge of the base plate that is furthest from the flat cable, then lever up the base plate at the edge that is nearest the flat cable, being careful to avoid strain on the cable. Do that on both sides a bit at a time, so the the base plate can be tilted back. If you fracture a lead in the flat cable, the head is totally stuffed!
Base plate now tilted back, showing a soft grey gasket with 8 holes. The gasket can be lifted off the black protuding orifices on the base of the black carriage.
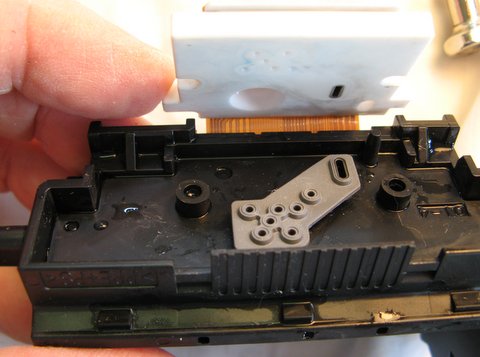
Here the grey gasket is shown lifted off the black protruding orifices. Wash the gasket in water and make sure that its 8 holes are clean of any goo. Flush water through the 8 holes in the black base of the carriage by running water onto the 5 nubs on the inside of the carriage and tapping them. Be very careful to not bend the flat cable so much that it will fracture!
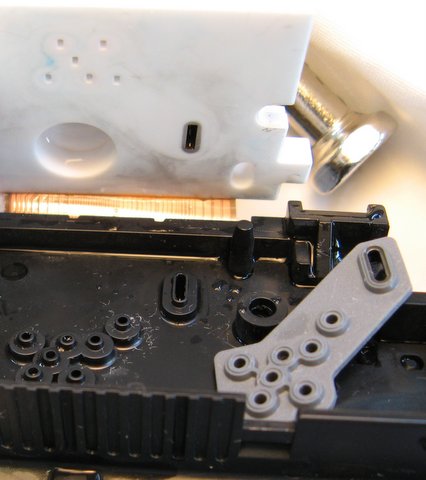
Flush water through the 7 metallic heads that are on the other side of the white base plate. The objective is to have the flush water come out the 6 small holes and the larger rectangular hole in this side of the base plate:

Having washed everything very carefully clean off any fluff or other debris, seat the grey gasket onto the underside of the black carriage by pushing the washer down onto the protruding black orifices with your finger and wiggling it as you do that. The gasket should stay in position and not flop about when it is correctly seated. Reposition the white base plate onto the black carriage bottom and screw down tightly using the two screws.
If all else fails
If all the above techniques fail, then you have these options:
1. If the printing problem is with just one of the cartridges, try a new cartridge even if it looks like there is still ink in the old one.
2. Buy a new print head. For instance, it used to be that a new genuine Canon iP4200 printhead can be bought for $57 (US) from here: http://officestoredepot.com/canon.aspx I bought one and it worked fine. It came in a genuine Canon Japan carton containing the head in a sealed mylar bag with Canon Japan printing on it. Subsequently I bought a supposedly new print head from a Chinese site. It did not have Canon Japan printing on the packaging materials. Printing on the bag was only Chinese. It was a recycled product and it never worked properly for me. Be warned!
3. Buy a new printer.
GOOD LUCK!
Disclaimer
Canon would undoubtedly regard the techniques explained above as voiding your printer warranty. So try the techniques at your own risk. I take no responsibility whatsoever for any of the consequences of implementing the techniques.
Mike Boesen